
Email marketing is one of the best tools you’ve got for club announcements and engagement. Not only is email an effective way of communicating with your members, but they're more likely to participate in tournaments and events if they feel connected to the club. The email feature in memberplanet makes it easy to send and track mass communications and email newsletters using templates, so you can stay connected with your members.
The NCGA is pleased to provide all NCGA member club best-in- class communication tools through the NCGA Member Management Solution/memberplanet. Have you tried send your members an email yet?
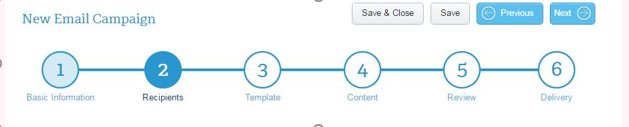
To create an email, follow the steps below:
On the left navigation bar, hover over Emails, then in the submenu, click on Send an Email.
Step 1: Basic information
Fill out the required basic information fields, then click Next.
Campaign Name refers to the title by which you’ll refer to this email in your records. It only shows up in your Manage Emails tab under this name, which is not visible to members. Sender address will auto-populate if you’ve previously entered this information in the member info tab.
Note: The address entered in this section will automatically appear in the lower left corner of your email. You are legally required to include a valid postal address.
Step 2: Recipients
Admins can choose to send emails to all members and/or contacts. Moreover, you can send to specific members, add new recipients manually, or from a previously-created contact list, all with only a few clicks.
If you wish to choose your recipients at a later time, you can skip this step by clicking Next.
1. Choose one of the five ways to add recipients:
- All Members: Select to send to all your members, contacts, or both in one click.
- Choose People: Select individual members from your group.
Note: You can only add members from one page at a time using this method. Make sure you click Save & Close before moving on to a new page of members.
- Choose a List: Select a distribution list you’ve previously created.
- Use a Smart List: Select a distribution list populated by dynamic queries based on member actions and statuses. For example, Smart Lists can be created based on a group’s member levels, or those who’ve RSVP’d to an event. (Learn more about Smart Lists)
- Add New People: Enter new people not otherwise associated with your group. They can be added individually, or uploaded from a separate email list.
Note: Newly added people in this section are categorized as contacts, not members.
2. Click the Save button
3. Select Next
|
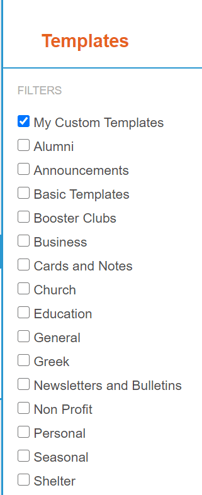
Step 3: Template Selecting a template will help you craft an email starting from a pre-built layout. You can still customize it with all your images, colors, and content to give it a personal touch.
Step 4: Content You can customize your content to match your unit’s colors and branding. Add calls to action to link out to online forms or your website, include member spotlight stories, and liven up your newsletter with engaging content. |
1. Click inside the template window to bring up the Editor Tool
2. Use the editor to add and format your content

Note: If you’re using a template with image placeholders, you can double click the images to replace them with an image from your computer.
3. Preview your email creation progress by selecting either the View as Web Page or Send Me a Test Copy function
You have more options to customize your email:
- Click on Add Follow Us Links at bottom of the email window to add social media links that allow members to easily follow your group on your preferred platforms.
- Click on Add Social Media links at the top of the email window to enable sharing by members on the selected platform.
- Select Add Banner Image to include a specific banner image for your email.
Step 5: Review
Once completed, review your email elements to ensure all the elements, such as recipients and links to social sites, were successfully added.
Click the Save This Email as a Template button if you’d like to reuse it. All you’ll have to do is update content specifics, but the design and general elements remain.
Step 6: Delivery
1. Choose one of the delivery options:
- Send this email now
- Send this email later
- Save this email as a draft
2. Click Finish to complete and send your email newsletter
Our email builder has all of the tools you need to create engaging content. Keeping in touch with members is a great way to boost participation, make announcements between meetings, and organize your group.